Buy Now, Pay Later: Pre-Purchase Workflows
Availability
We are currently making significant improvements to our Buy Now, Pay Later products. During this period, we are pausing new implementations. We will resume accepting new implementations in late 2026.
The page describes the endpoints and workflows creating and managing pre-purchase Galileo Buy Now, Pay Later.
Endpoints related to Buy Now, Pay Later: Pre-Purchase
This table lists the actions for creating and managing Galileo Buy Now, Pay Later, and related Loan API and Program API endpoints.
| Action | Endpoints |
|---|---|
| Create a single-use virtual card for a BNPL customer. | Create Single-Use Virtual Card |
| Push-provision a virtual card to a mobile wallet. | Create Provisioning Request |
| Simulate the loan options for customers to compare different loans. | Simulate Loan |
| Create the loan and disburse funds into a Galileo-linked account. | Create Loan |
| Create the loan for a small and midsize business (SMB) customer and disburse funds into a Galileo-linked account. | Create SMB Loan |
| Check the status of the loan, such as the current balance, loan cycle, and the remaining payments. | Get Loan Status |
| Create a payment on a single loan, either from a primary or external account. | Create Loan Payment |
| Check the payments made to date on the loan and receive an update schedule of future payments required. | Get Loan Payment Schedule |
| View individual installment status across all installments. | Get Loan Installment Statuses |
| Charge off an account. | Update Loan Status |
| Close the single use virtual card account. | Modify Status |
| Retrieve a complete history of the transaction data associated with a loan. | Get Loan Transaction History |
How it works
This section contains workflows that illustrate the processes for creating and managing a Buy Now, Pay Later service.
Virtual card creation and initial purchase
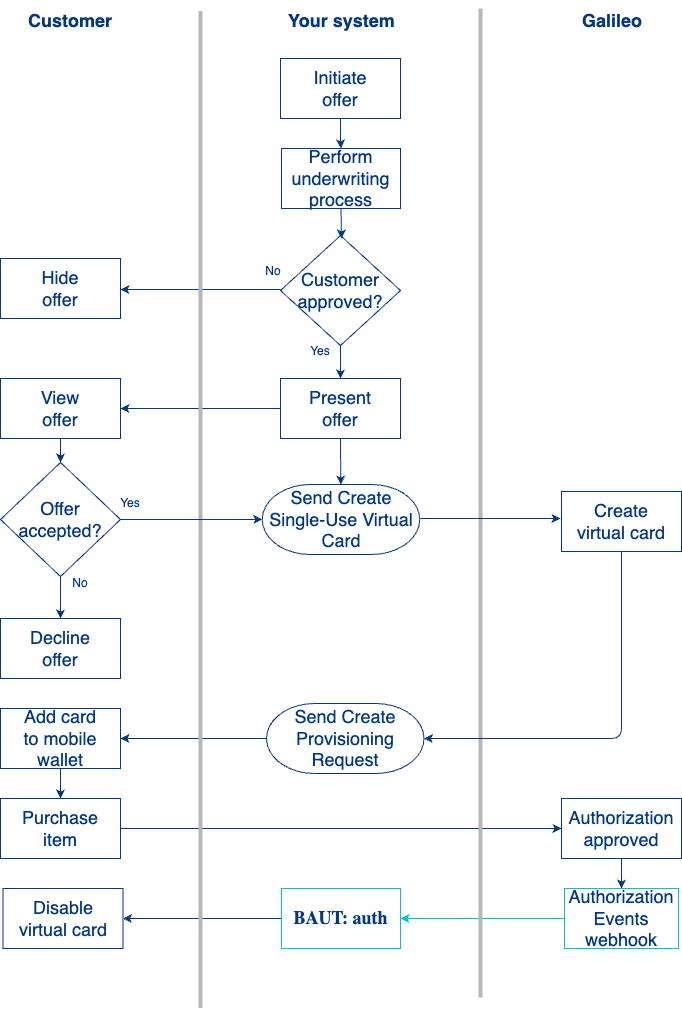
- Your customer in the Galileo system requests to make a purchase using your BNPL service.
- You perform the underwriting to determine the credit limit you want to extend to the customer.
- You present the BNPL offer to your customer.
- Customer accepts the offer and terms of the loan.
- You use the Create Single-Use Virtual Card endpoint to create a single-use virtual card and the associated credit account.
- You call Create Provisioning Request endpoint to push provision the virtual card into the customer’s mobile wallet. For further information on push provisioning, see Push provisioning in the Setup for Mobile Wallets guide.
- The customer makes a purchase with the provisioned virtual card at a retail or online merchant.
- The card network sends an authorization request.
- Galileo verifies that this is first purchase on this card and applies any MCC rules configured for the issuer’s program.
- Galileo notifies you of the purchase by sending the
BAUT: authevent. - The provisioned virtual card is removed from the customer’s mobile wallet.
Loan creation and first payment
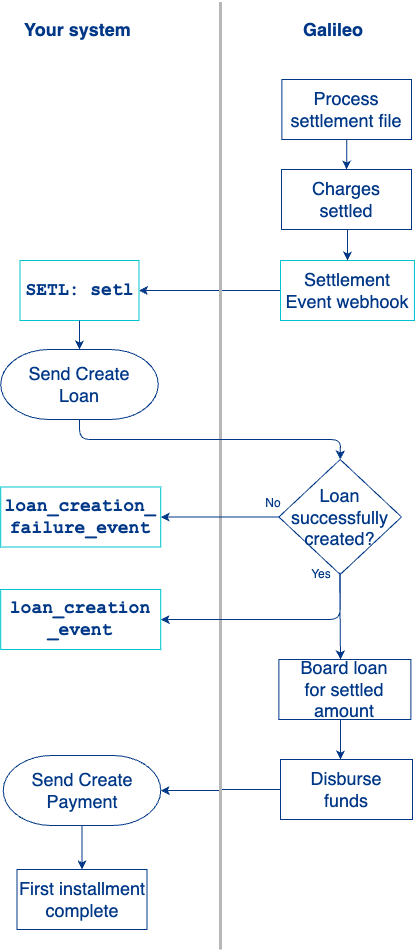
- Galileo receives the settlement data from Mastercard and updates transactions on the credit account from pending to posted.
- Galileo notifies you of settled transactions via the SETL: setl event.
- You create the loan based on the full settlement amount, which is the balance of the credit account, by using the following calls:
- For consumers - Send Create Loan endpoint
- For businesses - Send Create SMB Loan endpoint
- You receive notification that the loan has been created
loan_creation_event. If the loan fails to be created, you assess the errors provided in theloan_creation_failure_event. - Upon receiving the Create Loan response, you call Create Loan Payment endpoint to make the first payment on the loan.
- Galileo sends the Create Loan Payment response in confirmation of a successful payment.
Galileo authorizes or declines further transactions based on Mastercard Installments program guidance for card tokens. Any merchant initiated transactions will be approved as long as the card is active. Galileo notifies you of the approved or declined transactions via the Transactions Events API.
Subsequent payments and loan charge off
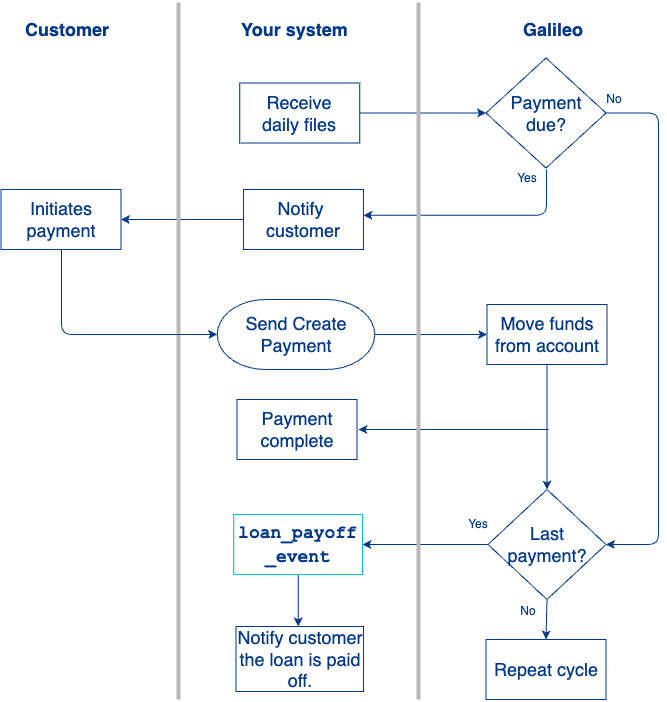
As a reminder, you are responsible for recording the installment loans issued and paying off the outstanding credit balance.
- You use the Daily Loan Status and Daily Transaction file to notify the customer the next payment is due.
- The customer receives the notification and initiates the payment.
- You use the Create Loan Payment endpoint to execute on the next payment.
- Repeat steps 1–3 for the remaining installments.
- On the last payment, you receive notification from Galileo that the loan is paid off (
loan_payoff_event). - You notify the customer that the loan is paid off and closed.
60 days after settlements, if there are no disputes, you are responsible for closing the single-use virtual card account using the Modify Status endpoint.