Creating a Corporate Hierarchy
Corporate Hierarchy is a way to create a hierarchy of groups and then associate accounts with the groups. A hierarchy starts with a root group, which contains a business profile, and then other groups are created as subgroups (child groups), for up to five levels down from the root group. After you create the group hierarchy you can associate accounts (either new or existing) with the groups.
With this arrangement, you can use your own tools to create a dashboard to display the spending for all of the accounts in a group, or all of the accounts in a group plus the subgroups.
Result of following this procedure
One root group and multiple non-root groups have been created in a hierarchy, and various accounts are associated with the groups.
Prerequisites
Your core must be on a Galileo AWS instance.
General characteristics
- You can create multiple root groups in your core.
- A group can have only one parent group.
- An account can belong to only one group at a time.
- The maximum number of levels below a root group is five, making six levels total.
To create a corporate hierarchy, perform these steps:
- Create a root group with its business profile.
- Create subgroups, starting at the next level down from the root group. When creating a subgroup, specify the parent group to create the hierarchy.
- Add accounts to the groups.
Example hierarchy
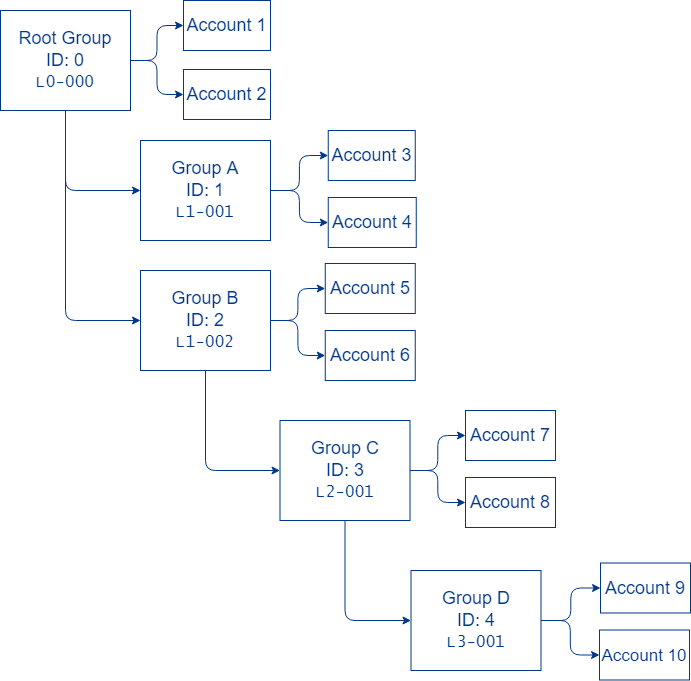
This is an example hierarchy. From the root group there are three subgroup levels.

Follow these steps to create the example hierarchy. The example assumes that ten card accounts already exist: their PRNs are represented as PRN1, PRN2, etc. The externalId, an optional parameter, contains sample values that specify the hierarchy level of the group. In your setup, you can use externalId however you choose.
-
Call Create Group with these parameters:
groupName: CDE Root GroupexternalId: L0000phone:[valid phone number, digits only]; if this parameter is populated, thenphoneCountryCodeis required.phoneCountryCode: +[valid country code]; if this parameter is populated, thenphoneis required.- Other business profile information as desired
maxLevel: 3smartdata:Set toYif you are signed up for the Mastercard Smart Data service, and you would like to receive Smart Data for all of the accounts associated with this root level and below.employerId: The employer ID (EID) from the IRS, if known.
-
The endpoint returns
group_id: 0. -
Call Create Group four more times with these parameters. For
smartdatado not pass a value.
groupName | parentGroupId | Business profile | externalId | group_id |
|---|---|---|---|---|
Group A | 0 | As desired | L1001 | 1 |
Group B | 0 | As desired | L1002 | 2 |
Group C | 2 | As desired | L2001 | 3 |
Group D | 3 | As desired | L3001 | 4 |
- Associate existing accounts with the groups. Call Set Account Group Relationships with these parameters:
groupId: 0accountNos: ["PRN1", "PRN2"](See Inputting multiple values for instructions on passing more than one value for this parameter.)
- Repeat the previous step for each group of accounts to associate with a group.
groupId | accountNos |
|---|---|
1 | ["PRN3", "PRN4"] |
2 | ["PRN5", "PRN6"] |
3 | ["PRN7", "PRN8"] |
4 | ["PRN9", "PRN10"] |
Viewing the group ID
The group ID is available in the following:
- Posted Transactions RDF as
CH GROUP ID - Events messages as
ch_group_id. You must request thatch_group_idbe enabled for each event message, as desired.
Managing the hierarchy
Follow these instructions to manage the example hierarchy.
Change the business profile
To change the business profile, such as the phone number, call Update Group and pass the parameter(s) to change:
phone: 18015552323
Retrieve group information
To retrieve group metadata, call Get Groups Info. For example, to retrieve the metadata for the root group and Group D, call Get Groups Info with this parameter:
groupIds: ["0", "4"](See Inputting multiple values for instructions on passing more than one value for this parameter.)
Response:
"response_data": [
    {
      "group_id": "0",
      "parent_group_id": Null,
      "group_name": "CDE Root Group",
      "external_id": "L0000",
      "max_level": 3,
      "phone_country_code": "+1",
      "phone": "18015551456",
      "business_legal_name": "CDE Corp",
      "doing_business_as": "SportsBall Enterprises",
      "primary_contact_email": "[email protected]",
      "primary_contact_name": "Maxina Seward",
      "smartdata": "Y",
      "employer_id": "99-9999999"
    },
    {
      "group_id": "4",
      "parent_group_id": "3",
      "max_level": Null,
      "group_name": "Group D",
      "external_id": "L3001",
      "business_legal_name": "",
      "doing_business_as": "",
      "phone_country_code": "",
      "phone": "",
      "primary_contact_email": "",
      "primary_contact_name": "",
      "smartdata": "",
      "employer_id": ""
      }
]
Retrieve root groups
To retrieve all of the root groups in your core, call Get Root Groups. The endpoint returns this:
"response_data":
    {
      "group_id": "0",
      "group_name": "Root Group"
    }
Retrieve the hierarchy
To retrieve the groups in the hierarchy, call Get Group Hierarchy. This endpoint returns only the groups, not the accounts.
For example, to return all of the subgroups for Group B (Groups C and D), call Get Group Hierarchy with these parameters:
groupId: 2subGroupLevel:Leave blank or0
Response:
"response_data": {
	"group_id": "2",
	"group_name": "Group B",
	"children": [
		{
		"group_id": "3",
		"group_name": "Group C",
		"children": [
			{
				"group_id": "4",
				"group_name": "Group D",
				"children": []
			}
	 	]
    }
	]
}
To return only one level below Group B (meaning Group C), pass these parameters:
groupId: 2subGroupLevel: 1
Response:
"response_data": {
    "group_id": "2",
    "group_name": "Group B",
    "children": [
        {
		"group_id": "3",
		"group_name": "Group C",
		"children": []}
       ]
   }
Retrieve the accounts in a group or groups
To retrieve the accounts in one or more groups, call Get Account Group Relationships. For example, to retrieve the accounts for Group B only, call Get Account Group Relationships with these parameters:
groupId: 2includeSubGroups: N
Response:
"response_data": [
    	{
        	"group_id": "1001",
        	"pmt_ref_no": [
            	"('PRN5',)",
            	"('PRN6',)"
        	]
    	}
	]
To retrieve the accounts for Group B as well as the accounts in Group B's subgroups, pass these parameters:
groupId: 2includeSubGroups: Y
Response:
"response_data": [
    	{
        	"group_id": "2",
        	"pmt_ref_no": [
            	"('PRN5',)",
            	"('PRN6',)"
        	]
    	},
    	{
        	"group_id": "3",
        	"pmt_ref_no": [
            	"('PRN7',)",
            	"('PRN8',)"
        	]
    	},
    	{
        	"group_id": "4",
        	"pmt_ref_no": [
            	"('PRN9',)",
            	"('PRN10',)"
        	]
    	}
]
Move an account to a new group
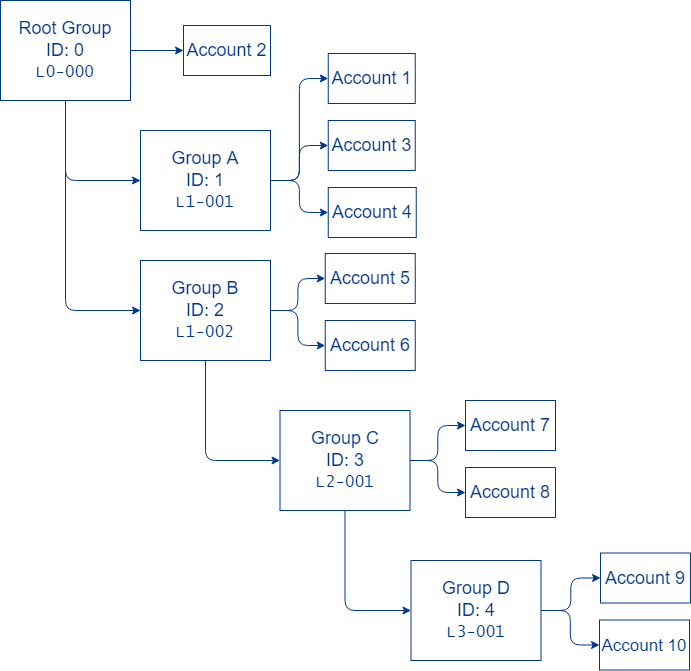
To move Account 1 to Group A, call Set Account Group Relationships with these parameters:
groupId: 1accountNos:PRN1 (See Inputting multiple values for instructions on passing more than one value for this parameter.)
Response:
"response_data": [
	{
      "group_id": "1",
      "pmt_ref_no": [
		  "PRN1"
	 ]
   }
]
The resulting hierarchy looks like this:

Delete a group
Use Delete Groups to delete one or more groups; however, you cannot delete a group that has subgroups or accounts linked to it.
- To delete a group that has linked accounts, follow the instructions in Move an account to a new group to move the linked accounts to a different group. Alternatively, you can use Remove Account Group Relationships to remove the accounts without moving them to a new group. You can link the accounts to another group later using Set Account Group Relationships.
- If the group to delete has subgroups, you cannot change the parent ID of those subgroups, so you must recreate the subgroups in another location in the hierarchy, move the subgroups' accounts to the new groups, and then delete the subgroups before deleting the current group.
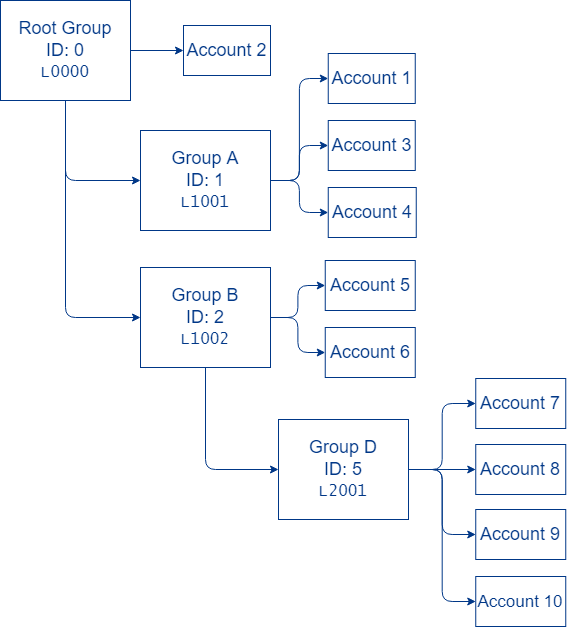
To delete Group C, for example, you first have to move Group D and its linked accounts to another location in the hierarchy. In this example, the new Group D will become a subgroup of Group B, and the accounts linked to Group C will be moved to Group D.
- Recreate Group D as a subgroup of Group B by calling Create Group with these parameters:
groupName: Group DexternalId: L2001parentGroupId: 2
- The endpoint returns
group_id: 5. - Move the Group C and old Group D accounts to the new Group D by calling Set Account Group Relationships with these parameters:
groupId: 5accountNos: ["PRN7", "PRN8", "PRN9", "PRN10"](See Inputting multiple values for instructions on passing more than one value for this parameter.)
- Delete the old Group D and Group C by calling Delete Groups with this parameter:
groupIds: ["3", "4"](See Inputting multiple values for instructions on passing more than one value for this parameter.)
The resulting hierarchy looks like this:

Inputting multiple values
Two of the parameters in some endpoints can accept multiple values:
accountNosgroupIds
You have two options to input multiple values: repeat the parameter or use a JSON list. Each option requires a different Content-Type header.
Repeated parameter
For this method, specify Content-Type: application/x-www-form-urlencoded in the header. In the body of the request, pass one parameter/value pair for each value. For example:
POST /intserv/4.0/setAccountGroupRelationships HTTP/1.1
Host: [URL]
response-content-type: json
Content-Type: application/x-www-form-urlencoded
Content-Length: 174

apiLogin=[redacted]&apiTransKey=[redacted]&providerId=19&transactionId=45d7ecbd-3e53-4a69-8971-af3bbaf17956&groupId=1001&accountNos=777777777777&accountNos=888888888888
JSON list
For this method, specify Content-Type: application/json in the header. In the body of the request, specify the values as a JSON list. For example:
POST /intserv/4.0/getGroupsInfo HTTP/1.1
Host: [URL]
response-content-type: json
Content-Type: application/json
Content-Length: 179

{
    "apiLogin": [redacted],
    "apiTransKey": [redacted],
    "providerId": "19",
    "transactionId": "d3914a0b-ce55-4d95-9926-2c8f3a3a9f10",
    "groupIds": ["1", "2", "5"]
}
Updated over 1 year ago
