Creating a Dispute
Availability
The Dispute API is under development and will be generally available in 2025.
This guide explains how to use the Dispute API endpoints to initiate and submit a dispute. You might want to read these guides along with this one:
- About Disputes — General explanation of the dispute process from inception to verdict.
- Disputes at Galileo — What Galileo offers with its dispute service.
- Managing Disputes — Instructions for managing dispute cases after they complete the intake flow.
With Galileo's Dispute API endpoints, you can integrate the dispute process into your mobile app or website to provide account holders with a seamless dispute experience. The account holder's experience might be as simple as this:
- Click a "dispute transaction" button or link.
- Select one or more transactions to dispute.
- Answer a series of questions about the transactions.
- Fill out additional documents, if required.
- Fill out contact information and submit the dispute.
- If later adjustments need to be made to the dispute, such as attaching more documents, edit the dispute.
- Track the status of the dispute until completion.
Using the Dispute API endpoints also ensures that disputes are made in compliance with card network requirements and regulations such as Regulation E and Regulation Z. Any updates to the requirements are accounted for on the backend, without disrupting your workflow.
Galileo has developed a conversational API for its disputes function. A "conversational" API is a series of calls that are made in a certain order, with the response from one call providing the data for the next call. By using a conversational API, Galileo makes it possible to tailor the user experience according to the nature of a given dispute and also to conform to regulations governing disputes. For example, if an account holder indicates that a disputed transaction is a duplicate, you can provide follow-up questions that are specific to duplicate charges, whereas an account holder who indicates suspected fraud will get questions that are related to fraud.
Result of following this procedure
When the full dispute-intake procedure has been successfully completed, a dispute case is entered into the dispute system. The information gathered and submitted for the case conforms to either Reg E or Reg Z, depending on the characteristics of the account and account holder.
UI requirements
For your mobile app or web site, create a user interface that permits account holders to initiate and submit a dispute case.
- The case-creation process involves multiple steps that must be performed in the order shown in the numbered steps below.
- The UI must be flexible enough to display dynamic responses from the endpoints, which are returned depending on the characteristics of the dispute that were indicated in earlier endpoints calls. Some responses from the account holder will trigger further displays, and so on.
- You should include an interface for uploading files.
Endpoint workflows
All of the endpoint sequences are on the Dispute API Workflows page. Use the links below to get to the specific sequence that you want, according to the type of dispute.
Fraud
"I did not authorize this transaction. I suspect fraud."
CardLost— "I lost my card."CardStolen— "My card was stolen."CardNotReceived— "I did not receive my card."CardSecure— "I didn't make the purchase, but I still have my card."
NonFraud
"I made this purchase, but there is a problem and I need to dispute it."
MerchantDuplicate— "I was charged more than once."MerchantCreditNotIssued— Mastercard only. "I canceled or returned the merchandise or service and have not received the expected credit."MerchantNotProvided— "I haven't received merchandise or a service I purchased."MerchantRecurring— "I have an issue with a recurring transaction on my account."MerchandiseServiceIssue— "I am dissatisfied with merchandise or a service I received."ChargedCreditedIncorrect— "I was charged or credited incorrectly."
| — Back to top — |
Case-creation workflow
Warning
You must call the endpoints in the order shown for each dispute type. Failure to follow the sequence will prevent you from completing the intake flow.
This section shows all possible steps as one continuous flow. Be sure that you follow the specific endpoint workflow for your use case.
- Initiate the case and obtain the case reason
- Select transactions
- Get follow-up questionnaire answers
- Attach documents
- Finalize the case
1. Initiate the case and obtain the case reason
Initiate the case, obtain the case reason from the account holder, and send it back to Galileo.

- The account holder initiates a dispute case on your mobile app or website by clicking an "initiate dispute" control.
- You call the Create Case endpoint with the PRN, PAN, or CAD of the account.
- Galileo returns the
caseId. You passcaseIdfor all subsequent calls for the case. - You call Get Case Reasons with the
caseId. - Galileo returns a JSON containing the case reason types and case reasons. The response varies depending on the account and user type. For example, a consumer debit account might get a different response than a business credit account.
- You present the case reasons to the account holder. See Presenting the case reasons for instructions.
- The account holder selects the category and reason.
- You pass the category and reason back to Galileo in the Add Case Reasons call. See Returning the case reasons for more information.
- The endpoint returns
status_code: 0.
Presenting the case reasons
Use the response from the Get Case Reasons endpoint to populate a screen that prompts two interactions with the account holder. First, the account holder selects a case reason type (ClaimReasonType) and then selects a case reason (ClaimReason).
The JSON in the response is structured as answerList levels nested inside questionList levels. The first level contains the case reason type in the top level, and then when the account holder selects one of the types, you present the corresponding case reasons in the next level down.
This is an example of the first screen to present. The values in parentheses are identifier values in the Get Case Reasons response. You may get a different set of fields in the response depending on the account and account holder types.
Which of the following would you like to report? (ClaimReasonType)
- I made this purchase, but there is a problem and I need to dispute it. (
NonFraud) - I did not authorize this transaction. I suspect fraud. (
Fraud) - I had an issue while using my card at an ATM. (
NonFraudATM)
When the account holder selects a case reason type, present the case reasons that are nested in the corresponding answerList. The case reasons should have radio-button controls so that the account holder can select only one case reason. For example, if the account holder selects NonFraud, present these options:
Which of the following best describes the reason for your dispute? (ClaimReason)
- I was charged or credited incorrectly. (
ChargedCreditedIncorrect) - I am dissatisfied with the merchandise or a service I received. (
MerchandiseServiceIssue) - I continue to be charged for a recurring transaction after I canceled. (
MerchantRecurring) - I canceled or returned the merchandise or service and have not received the expected credit. (
MerchantCreditNotIssued) - I haven't received merchandise or a service I purchased. (
MerchantNotProvided) - I was charged more than once. (
MerchantDuplicate)
Returning the case reasons
When the account holder selects the case reason type, case reason and other information, pass it back to Galileo by calling the Add Case Reasons call. The questionnaire parameter accepts a JSON list (questionList) that contains identifier/answerValue pairs: identifier contains the identifier for the question in the Get Case Reasons response and answerValue contains the response that the account holder selected or entered.
At minimum, you will include the ClaimReasonType and a ClaimReason. These are the valid combinations for the example shown above.
ClaimReasonType | ClaimReason |
|---|---|
NonFraud | MerchantDuplicateMerchantNotProvidedMerchantCreditNotIssuedMerchantRecurringMerchandiseServiceIssueChargedCreditedIncorrect |
Fraud | CardLostCardStolenCardNotReceivedCardSecure |
For example, you would populate questionnaire like this:
[{"identifier": "ClaimReasonType", "answerValue": "NonFraud"}, {"identifier": "ClaimReason", "answerValue": "MerchantDuplicate"}]\`
| — Back to top — |
2. Select transactions
Present a list of eligible transactions for the account holder to select and pass the transactions back to Galileo.

- You call Get Transactions with the
caseId. You pass start and end dates and optionally the amount and merchant name as filters. - Galileo returns a list of transactions that are eligible for dispute and that fit the filter criteria.
- You present the list of transactions to the account holder. The list should have check-box controls to select multiple transactions. See Transaction entries for more information.
- You submit the transaction IDs of the selected transaction(s) in the Add Transactions call. See Submitting the transactions for the restrictions on this call.
- The endpoint returns
status_code: 0.
Transaction entries
Each entry that is returned by Get Transactions contains these metadata fields:
authorizationStatus— The only valid value isPosted.debitCredit— Whether the transaction debits or credits the account:DebitCredit
transactionType— The type of transaction. Possible values:ACH— ACH transactionATMWD— ATM withdrawalCardPinless— Card transaction without PIN (signature)CardPinned— Card transaction with PINP2P— Peer-to-peer transfer
description— The description of the transactionamount— Transaction amount; unsignedcardNumberEndingIn— Last 4 digits of the PANdate— Date of the transaction:YYYYMMDDtransactionId— Identifier assigned by the disputes platform
You may need to record each disputed transaction with its metadata so that you can make the correct decision if you are awarding provisional credit. See Provisional credit in About Disputes for more information.
Submitting the transactions
When submitting the transactions using the Add Transactions endpoint, you must follow these rules, depending on the ClaimReasonType that you submitted with the Add Case Reasons call:
- If
ClaimReasonType!= Fraud, all transactions submitted in an Add Transactions call must be from the same merchant. If the account holder has selected transactions from multiple merchants, send multiple Add Transaction calls with the transactions from the same merchant bundled together. - If
ClaimReasonType= Fraud, the transactions in the same call can be from different merchants.
Every time you call Add Transaction, you create a "dispute." Every case contains one or more disputes. This distinction between a case and a dispute will be important when you receive the event messages via webhook after you finalize the case.
If you send Add Transactions multiple times with different but overlapping values, the last request is honored. For example, if you send transactions 1111 and 2222, and then soon after send 2222 and 3333, transactions 2222 and 3333 are submitted—1111 is not.
| — Back to top — |
3. Get follow-up questionnaire answers
According to the CaseReason that the account holder returned, present the follow-up questions.

- You call Get Questionnaire with the
caseId. - Galileo returns a JSON of the questionnaire.
- You present the questionnaire to the account holder, according to the contents of the response. See Presenting the questionnaire for instructions.
- The account holder answers the questions.
- You pass the answers back to Galileo with the Add Questionnaire call. See Returning the answers to the questionnaire for instructions.
- The endpoint returns
status_code: 0.
Presenting the questionnaire
The questions that you receive in the response to Get Questionnaire will vary according to the CaseReason that you passed in the Add Case Reasons call as well as the network. The response may contain many dozens of lines of JSON formatting.
Note
Every questionnaire is subject to change over time as network requirements change, so you should not cache the questionnaires. Your interface must be able to handle truly dynamic responses.
As with the JSON in the Get Case Reasons response, there are answerList levels nested inside questionList levels. However, instead of only two levels of questions, the number of levels that you will use depends on the answers that the account holder provides in each level.
For example, if you submitted ClaimReasonType: Fraud and ClaimReason: CardSecure ("I didn't make the purchase, but I still have my card.") in the Add Case Reasons call, the questionnaire that Get Questionnaire returns is called FraudCardSecure. See Dispute Questionnaire: FraudCardSecure for an example response, keeping in mind that this is an example only, and your response may be different.
The next level down is a questionList called EverDoneBusiness that contains one question:
{
"type": "Section"
"identifier": "EverDoneBusiness"
"displayText": "Have you ever done business with any of these disputed merchants?"
"dataType": "String"
}
Nested inside that questionList level is the answerList with two possible answers, Yes and No, and nested inside the Yes answer are follow-up questions that you display depending on which answer the account holder selects. If the account holder selects No then there are no further questions to display for that answer. If the account holder selects Yes, then you display the next question:
{
"type": "YesNo"
"identifier": "RecognizeDisputedMerchant"
"displayText": "Is it possible that this is a planned, recurring transaction, such as a monthly or yearly subscription?"
"dataType": "String"
}
There are no more questions nested in that level, so you move to the next set of questions, which begins with this one:
{
"type": "YesNo"
"identifier": "CardPossessionInd"
"displayText": "Do you always have possession of the card?"
"dataType": "String"
}
If the account holder answers No, present the next set of questions, starting with:
{
"type": "Text"
"identifier": "CardNoPossession"
"displayText": "In what circumstances do you not have the card in your possession?"
"dataType": "String"
}
As the account holder answers the questions, present any follow-up questions that are nested inside the answers until you reach the end of the node, and then go to the next question in that level. Capture the identifier and the answer for each question answered to return in Add Questionnaire, as described in the next step.
Note
If you returned
ClaimReason: MerchantDuplicateorClaimReason:MerchantCreditNotIssuedin the Add Case Reasons call in Step 1, go to Calling endpoints in the questionnaire for additional instructions.
This is one possible sequence of answers for the FraudCardSecure questionnaire. The identifier for the question is shown in parentheses:
- Have you ever done business with any of these disputed merchants? (
EverDoneBusiness)- Yes
- Is it possible that this is a planned, recurring transaction, such as a monthly or yearly subscription? (
RecognizeDisputedMerchant)- No
- Do you always have possession of the card? (
CardPossessionInd)- No
- Where is the card usually kept? (
CardLocation)- "In my purse"
- In what circumstances do you not have the card in your possession? (
CardNoPossession)- "When I go to the gym"
- Have you ever authorized another person to use your card? (
HasAuthorizedOthers)- No
- Have you ever shared your Personal Identification Number (PIN)? (
HasSharedPIN)- No
- Where do you keep your PIN? (
WherePinKept)- In memory (
InMemory)
- In memory (
- Where is the card usually kept? (
- No
- Do you always have possession of the card? (
- No
After presenting the main parts of the questionnaire, you display the postQuestionnaire questions, which permit the account holder to add information such as comments or to attach further documents.
- Do you have any additional information to provide about this dispute? (
AddlInfo)- No
Questionnaire attributes
Questions may include one or more of these attributes:
| Attribute | Description | Type | Valid values |
|---|---|---|---|
format | Metadata that describes the question format. You can use the values to provide different visual treatment to each format type. | String | CaptionDefaultInternalNotificationWarning |
isOptional | Whether the question is optional. | Boolean | true or false |
selectedAnswer | The selected answer to this question. This could be a default for an initially loaded questionnaire or a persisted previous answer. | String | "Yes" |
apiDocumentationList | This is returned for questions of type Section. It provides the details of optional endpoints that need to be called to provide the answer to the question. See Calling endpoints in the questionnaire for details.These are the sub types: implementationNotes (String) — Description of the endpointendpoint (String) — The name of the endpoint to call.method (String) — The HTTP method of the endpoint | List of dictionaries | "apiDocumentationList": [{"implementationNotes": "Get a list of similar transactions within search criteria that can be selected to add to the case.","endpoint": "/getSimilarTransactions","method": "post"}] |
dataType | Data type for the answer to the question | String | See the table below. |
The dataType fields in the questionnaires have these possible values. Each data type accepts the answer formats shown in the answerValue type column.
dataType | answerValue type | Example |
|---|---|---|
| String | Text | I left my card at the gym |
| Decimal | Floating-point decimal | 34.55 |
| Integer | Whole number | 40 |
| Date | Date as YYYYMMDD | 20240310 |
| DateTime | Date and time as yyyyMMddTHHmmss.SSS z | 20230201T225915.773 GMT |
| Boolean | Boolean values of true or false | true |
| List | Multiple text items | See Adding List answers |
Returning the answers to the questionnaire
The questionnaire parameter in the Add Questionnaire endpoint accepts a JSON list (questionList) that contains identifier/answerValue pairs. identifier contains the identifier for the question in the Get Questionnaire response and answerValue contains the response that the account holder selected or entered.
This example shows what you would return for the questions in the example section, above:
questionnaire: [
  	  {
       		 "identifier": "EverDoneBusiness",
       		 "answerValue": "No"
  	  },
  	  {
       		 "identifier": "RecognizeDisputedMerchant",
       		 "answerValue": "No"
  	  },
  	  {
       		 "identifier": "CardPossessionInd",
       		 "answerValue": "No"
  	  },
  	  {
       		 "identifier": "CardLocation",
       		 "answerValue": "In my purse"
  	  },
  	  {
       		 "identifier": "CardNoPossession",
       		 "answerValue": "When I go to the gym"
  	  },
  	  {
       		 "identifier": "HasAuthorizedOthers",
       		 "answerValue": "No"
  	  },
  	  {
      		 "identifier": "HasSharedPIN",
      		 "answerValue": "No"
  	  },
  	  {
      		 "identifier": "WherePinKept",
      		 "answerValue": "InMemory"
  	  },
  	  {
  	  "identifier": "AddlInfo",
  	  "answerValue": "No"
  	  },
  	  (
  	  "identifier": "HasVisaComments",
  	  "answerValue": "No"
  	  )
]
Adding List answers
List answersWhen the questionnaire includes an item that has "DataType":"List", you can return two or more items that have the same identifier value. For example:
        	{
            	"identifier": "ContactMethodMerchant",
            	"answerValue": "ContactMethodMerchantEmailInd"
        	},
        	{
            	"identifier": "ContactMethodMerchant",
            	"answerValue": "ContactMethodMerchantPhoneInd"
        	},
Calling endpoints in the questionnaire
Some of the questionnaires include endpoint calls to make depending on how an account holder answers the questions. This type of questionnaire is returned when ClaimReason is:
MerchantDuplicate(I was charged more than once)MerchantCreditNotIssued(I canceled or returned the merchandise or service and have not received the expected credit.)
The questions with endpoints are type: Section and include APIDocumentationList. This example shows how you are instructed to call Get Similar Transactions and Add Similar Transactions.
{
  'type': 'Section',
  'answerList': [
	{'identifier': 'Selected',
 	'displayText': ''
	}],
  'identifier': 'SelectedValidTransaction',
  'displayText': 'Please select a valid transaction.',
  'dataType': 'String',
  'APIDocumentationList':
	[
  	{
    	'implementationNotes': 'Get list of similar transactions within search criteria',
    	'endpoint': '/getSimilarTransactions',
    	'method': 'post'
  	},
  	{
    	'implementationNotes': 'Add selected duplicate transaction to claim',
    	'endpoint': '/addSimilarTransactions',
    	'method': 'post'
  	}
	]
}
In this case, the payload of Add Questionnaire for the above question should be identifier = SelectedValidTransaction (what was returned in the identifier key of Get Questionnaire, above) and answerValue = answerList.identifier (Selected).
{
  "Identifier": "SelectedValidTransaction",
  "AnswerValue": "Selected"
},
Consult these sections for details on calling endpoints within the questionnaire.
MerchantDuplicate sequence
MerchantDuplicate sequenceThis flowchart shows the sequence of events when the disputed transaction is a duplicate.
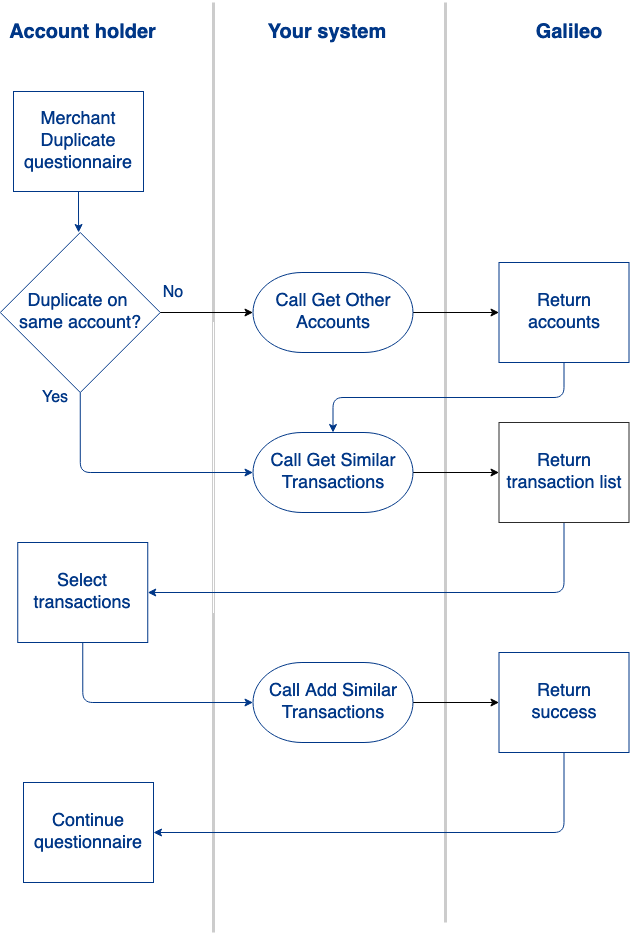
Question: "Is the valid transaction on this same account?" (BothTransactionsOnSameAcctNumberInd)
- Yes — Call Get Similar Transactions with search criteria such as amount or merchant name. You can also present a "change search criteria" control.
- The endpoint returns similar transaction(s), which you can present on the interface with "Please select a valid transaction." (
SelectedValidTransaction) - When the account holder selects the transaction, call Add Similar Transactions to add the transaction(s) to the case.
- The endpoint returns similar transaction(s), which you can present on the interface with "Please select a valid transaction." (
- No — Present the question "Is the other transaction on a [your brand] Card?" (
IssuerOrCardholderOtherAcctWithDiff[MC|Visa]CardInd)- Yes — Call Get Other Accounts.
- The endpoint returns other accounts belonging to the account holder, each with its
accountNumber. - You present the list with "Select the account the charge(s) appear on." (
SelectedValidAccount) - The account holder selects the account.
- You call Get Similar Transactions, passing the selected account number for
otherAccountNo. - The endpoint returns the other account's transaction(s), which you present on the interface with "Select the duplicate charge" (
SelectedValidTransaction). - When the account holder selects the valid transaction(s), call Add Similar Transactions to add the transaction(s) to the case.
- When Galileo returns success, return to the next question in the questionnaire.
- No — Present the question "What was the other form of payment?" (
OtherMeansPaymentForm) - The account holder chooses from among the options: Another [Mastercard | Visa], Other Card, Check, Cash, or Other.
MerchantCreditNotIssued sequence
MerchantCreditNotIssued sequenceQuestion: Were you issued a partial credit? (IssuedPartialCredit)
- No — Return to the next question in the questionnaire.
- Yes — Call Get Credit Transactions. Populate
otherAccountNoif the credit transactions are on a different account than the current account.- The endpoint returns transaction(s) that credit the account, which you can present on the interface with "Please select a valid transaction." (
SelectedValidTransaction) - When the account holder selects the transaction, call Add Similar Transactions to add the transaction(s) to the case.
- The endpoint returns transaction(s) that credit the account, which you can present on the interface with "Please select a valid transaction." (
| — Back to top — |
4. Attach documents
Depending on the case reasons and the transactions selected, the account holder may need to fill out a form.
Note
This step is optional. However, if you call these endpoints (Get Doc Requirements and Add Required Docs), you must call them during the intake flow. To retrieve and submit any required documents after completing the intake flow, you can use two similar endpoints: Get Requirements and Add Document.

- You call Get Doc Requirements.
- Galileo returns one of two options:
- A message saying that no further documents are required.
- A base64-encoded PDF (
templateDocumentationStream) that the account holder must fill out and return. When the account holder has filled out the form, you call Add Required Docs to send the completed form to Galileo.- Send only one document at a time with Add Required Docs. If you need to send multiple documents at this stage, call Add Required Docs once for each document to return.
| — Back to top — |
5. Finalize the case
The account holder reviews the case details, and then clicks "Submit" at the end of the process.

- At the end of the intake flow, you can call Get Case Summary to display the case details to the account holder for review.
- This endpoint also returns questions for the account holder or the dispute agent to fill out regarding contact information for this case only (if it is different from the account holder's current information).
- If the endpoint returns the
CustomerContactOverrideDatesection, do not display the questions to account holders in your interface. The customer contact date should be changed only by an agent, and only if the contact date is in error.
- If applicable, the account holder reviews the case, fills out the contact information, and clicks a "submit" control to signal that they have finished inputting information for the case.
- You call Submit Case. The Requirements for submission must be fulfilled.
- The
questionnaireparameter accepts a JSON list (questionList) that containsidentifier/answerValuepairs.identifiercontains theidentifierfor the question in the Get Case Summary response, andanswerValuecontains the response that the account holder selected or entered. Use the same format that you used for Add Questionnaire. - The
correspondenceDetailsparameter also accepts a JSON list. SeecorrespondenceDetailsSubfields for instructions on populating this parameter.
- The
- Galileo returns success and then sends the following event messages:
CSCT: case_created— The message contains thecase_noand specifies which disputedtransactionIds (dispute_ids) are included in the case.DSCT: dispute_created— One for each time that you called Add Transactions. The message indicates thecase_nothat the disputed transaction belongs to.
Requirements for submission
Before you can call Submit Case, these minimum requirements must be fulfilled:
- The case number was created. (Create Case)
- The case-reason category and reason were submitted. (Add Case Reasons)
- One or more transactions were submitted. (Add Transactions)
- The questionnaire answers were submitted. (Add Questionnaire)
Note
If the account holder begins the dispute process but does not complete it, the case that was created remains in the dispute system for eight hours and then times out. If the account holder decides to return to a case that has timed out, you have to start over with Create Case to create a new
caseId.
After submitting the dispute
After you have successfully called Submit Case, you can optionally call Get Case Confirmation to retrieve a confirmation number and PDF that you can present to the account holder.
Note
Get Case Confirmation is the only endpoint that you can call immediately after successfully calling Submit Case. For all of the other dispute-management endpoints, you must wait several seconds until after the case has been processed. If a dispute-management endpoint returns a "case not found" status message, call the endpoint again after several more seconds.
Before the verdict arrives, if the account holder wants to add more documents to the case, or if the account holder needs to return the required PDF form, call Add Attachments with the case ID to attach the documents.
- Supported file types: JPG, JPEG, TIFF, PNG and PDF
- File size maximum:
- Mastercard — 20 MB
- Visa — 10 MB
For more information on what happens to a dispute case after it is submitted, begin with Post-intake processing in Disputes at Galileo or consult the Card-transaction dispute lifecycle in About Disputes.
To manage dispute cases after they have been submitted, go to Managing Disputes.
| — Back to top — |